Background Information:
Monocots and Eudicots (formerly called Dicots) are two groups of the flowering plants. Other groups include the Magnolia family and the Water Lily family. Monocots and Eudicots are extremely important to our environment and economy as they generate the foods that we eat, lumber, paper, and biomass for generating biofuels. Monocots are the grains we eat (corn, wheat, rice, oats) and eudicots are our fruits and vegetables.
The main difference between monocots and Eudicots is found in their seed structure. When a monocot seed is opened, the stored food of the seed (the part we eat) is found as one unit, thus the “mono”. Think of a corn kernel or any other type of grain. Eudicots have the food source broken into two parts – “di”. Specifically, when the seed germinates, the monocot will form one seed leaf (the cotyledon) and the Eudicot will form two seed leaves. The monocot will send up one shoot, while the eudicot sends up one shoot that splits into two parts.
Monocots are characterized by leaves that have parallel veins. This means that all the veins start at the base of the leaf and move parallel to one another toward the end. Eudicots have leaves with net veins. These leaves have one main vein in the center of the leaf (mid rid or central vein). All other veins branch off of this central vein forming a net pattern. (Note: Some eudicots have “parallel net veins”, which means that the veins run parallel to one another but still branch off of the central vein. True parallel veins characterizing monocots all extend from the base of the leaf as seen in grass and corn.
Monocots also have fibrous roots lacking one central root, while the Eudicots have a main taproot with small roots branching off of it.
Materials Needed for Each Group:
- 5 of each type of Monocot Seeds: Corn, grass
- 5 of each type of Eudicot Seeds: Beans, Sunflowers
- 4 Quart Sized Ziplock Bag
- Paper Towels
- Scissors
- Tape
- Water
- Student Data Sheets: Students will need one sheet for each type of seed used
Additional Materials for Extended Study:
- 6 Leaves that show parallel and net venation patterns (3 of each): Parallel (Monocots): Grass, corn (husks from corn on the cob work), bamboo, Tradescantia plants (Wandering Jew, Spiderwort), Spider plants, Liriope (Monkey Grass)
- Examples of Fibrous and Taproots: Fibrous (Monocots): Grass
- Examples of Monocot and Eudicot Flowers: Flowers can be used as demonstration only (Students look at the flowers and count the petals to identify them as monocot or Eudicot) or multiple flowers can be purchased so each student can “dissect” it by pulling the flower apart to count the petals and stamens. This could lead into a separate study of flower structure and the process of pollination/plant reproduction. Monocot: Flower Parts in multiples of 3x. Ex: lilies, Alstroemeria (Peruvian Lily)
- Tape
- Water
- Student Data Sheets: Students will need one sheet for each type of seed used
Net (Eudicots): Maple, Oak, Dogwood (shows parallel net), Hosta, Birch, Any hardwood tree, Holly, Dandelion
Note: Cone bearing trees are neither monocots nor eudicots. They are gymnosperm and a separate group of plants. Ferns are also a separate group.
Taproot (Eudicots): Dandelion, Carrot
Eudicots: Flower Parts in multiples of 4x or 5x.Ex: African violets, geraniums, pansies
Note: Flowers such as sunflowers, daisies, and roses are Eudicots as well but have a more complicated structure and don’t clearly show the typical Eudicot traits.
- Label each bag with your group name and the seed type.
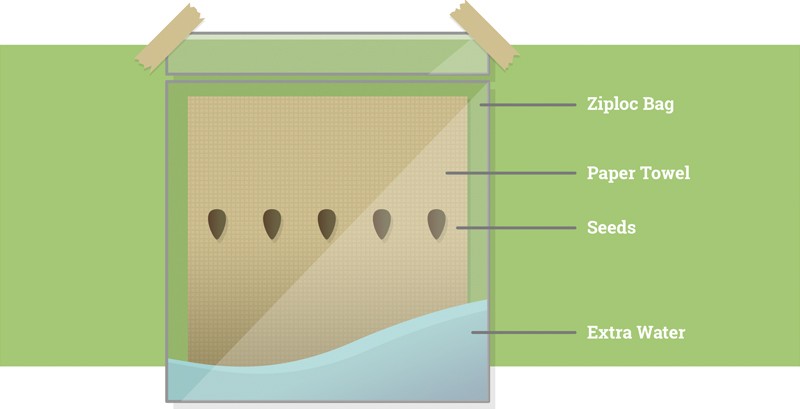
- Trace the Ziplock bag on the paper towel. Make sure the height of the towel is from the bottom of the bag to just below the “zip” line.
- Cut the paper towel so that it will fit inside of the Ziplock bag.
- Repeat this so each Ziplock bag has two layers of paper towel (8 pieces of paper towel in total)
- Place two pieces of paper towel in each bag.
- Add about 10 mL of water to the bag and close it. Move the water around the bag so the paper towel is completely soaked. There should be a little pool of water at the bottom of the bag when it is held upright. If not, add a little more water.
- Carefully place the five seeds across the middle of the paper towel and seal the bag squeezing the air out so the seeds are pressed between the bag and paper towel. Repeat with each type of seed.
- Hang the bags on the wall using a piece of tape
- Allow several days for the seeds to germinate. Once the seeds have germinated, draw what each seed looks like. Repeat the observation and drawing three more days.


